A Better Baofeng UV-5R Instruction Manual
written by Aden Tate – SHTF BLOG https://www.shtfblog.com/
If you find the standard Baofeng UV-5R instruction manual frustrating, you’re not alone. I’ve written this article because I too found it difficult to follow. Consider this article a Baofeng UV-5R instruction manual for dummies. Follow along to save time, and at the end, we have a condensed PDF instruction manual of this article that you can download and print.
I mention a variety of different products here that are entirely optional, but highly recommended – if you want to extract the maximum benefit from your Baofeng radio. For ease of reference, they are all in the following chart.
| Product | Purchase Link |
|---|---|
| Baofeng UV-5R Radio | Amazon |
| AARL Ham Radio License Manual | Amazon |
| Baofeng Programming Cable | Amazon |
| Nagoya NA-771 Whip Antenna | Amazon |
| Military Adapter 2 Pin Plug Push | Amazon |
With that, let’s figure out how to operate the Baofeng UV-5R radio.
- Baofeng UV-5R Instruction Manual for Dummies
- A Note on CHIRP Software
- Notes on UV-5R Specs
- How to Turn Your Baofeng UV-5R On
- Attaching Accessories
- How to Turn on the Flashlight
- How to Transmit/Talk to Somebody
- How to Switch Between Channel and Frequency Mode
- How to Switch the Frequencies You’re Listening to and Transmitting On
- How to Change the Channel You’re On
- How to Type in a Frequency
- How to Switch Between VHF and UHF
- How to Listen to Broadcast FM
- How to Change Bands Within Broadcast FM
- How to Change Your Transmit Power
- Changing the Squelch Level
- How to Lock the Keypad
- How to Scan Frequencies
- Ways to Change Scanning Preferences
- How to Monitor Two Frequencies at Once
- How to Change the Backlight Color
- How to Add Frequencies to the Radio’s Memory
- How to Remove Saved Frequencies
- How to Send a 1750Hz Burst
- How to Turn on Hands-Free Usage
- Download Our Baofeng UV-5R Instruction Manual PDF
Baofeng UV-5R Instruction Manual for Dummies
So, you finally did it. After buying the AARL Ham Radio License Manual and conducting a crash course in ham radio, you got your license, and then promptly went out to buy the very popular Baofeng UV-5R radio. Such has been a path traveled by thousands of other hams throughout the years, and you’ve likely discovered the same thing that the rest of us have.
Though the UV-5R is an incredibly affordable radio – coming in at around $25 or so, giving you an introduction into ham without too much expense – it is one of the most difficult radios to learn if you’re operating from the standard instruction manual they include.
It’s often said that the UV-5R has the worst manual out of any radio within the ham industry, and I’m convinced this is true. Figuring out how your new radio works can be incredibly frustrating and can feel as if you’ve just wasted your time and money. The included manual has been the direct cause of countless hams setting aside both their radio and their desire to learn how to use amateur radio.
Thankfully, learning the UV-5R is possible. Let’s take a look at what it takes to get your UV-5R up and running. Consider this the basic manual that should have come in the box.
A Note on CHIRP Software
If you’ve done any bit of research into getting your UV-5R up and running at all, you’ve undoubtedly heard reference to the CHIRP software. It is widely used as an “easy” programming tool to program local repeaters into your UV-5R. I’m not going to even touch on it in this manual.
In my opinion, CHIRP is one of the most user-unfriendly softwares that has ever been created. It’s absolutely terrible. I stared at CHIRP for hours and watched who-knows-how-many YouTube videos to try to figure out what in the heck was going on. I’m serious, it’s absolutely ridiculous.
If you decide to go the route of CHIRP, just know that you’re going to need to purchase a specialized cable to attach from your UV-5R to your laptop as well. Older models of the UV-5R used to allow “cloning” of different radios – meaning that if your buddy had a UV-5R already programmed with all the local repeaters, you could just connect yours to his with another special cable, and all of the data would be transferred to your UV-5R. For whatever reason, newer models do not allow this.
So, let’s avoid CHIRP, and get on to how you can use your UV-5R without ever having to touch that detested software.
Notes on UV-5R Specs
One of the chief things that you need to know about your UV-5R is that the radio (called a transceiver – because it both transmits and receives messages) has a male SMA connector. This means that it needs a female SMA connector antenna to work. What comes in the box is both the necessary antenna and radio.
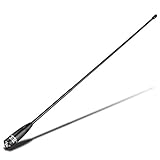
The type of antenna that comes in the box of your stock UV-5R is referred to as a “rubber duck.” It’s an absolute terrible antenna. One of the first pieces of advice that just about any seasoned ham operator (referred to as an “elmer”) will tell you is that your radio is only as good as your antenna. I say this because one of the first things that you need to do for your UV-5R to function effectively is to upgrade your antenna.
I highly recommend the Nagoya NA-771. This will probably cost you around $25 and is well worth the cost.
SALE
- Certified Original Nagoya Antenna – with an exclusive manufacturing partnership with BTECH
- New Release – May Require a Rubber spacer (included) and has an extended antenna cover to protect your radio SMA male base from the elements
With the stock antenna, I have been able to listen to people from two hours away to as far away as Las Vegas! The problem is that I can’t talk back to them. Even when I tried to transmit to an elmer about 100 yards away from me in a parking lot, my transmissions still came through fuzzy and undecipherable. If you want to be able to transmit (and you do), then you need to upgrade your antenna, and you need to get one with a female SMA connector.
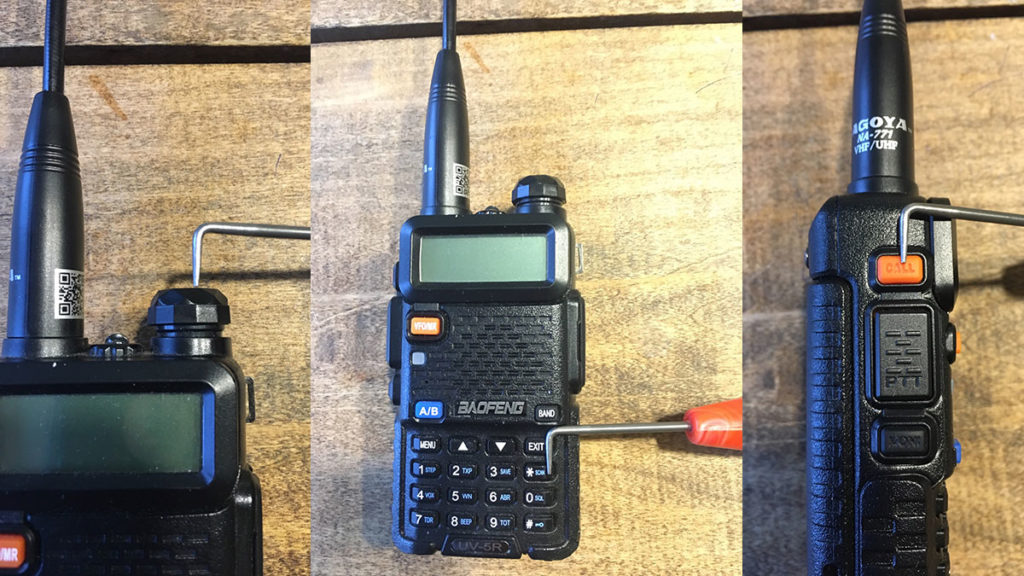
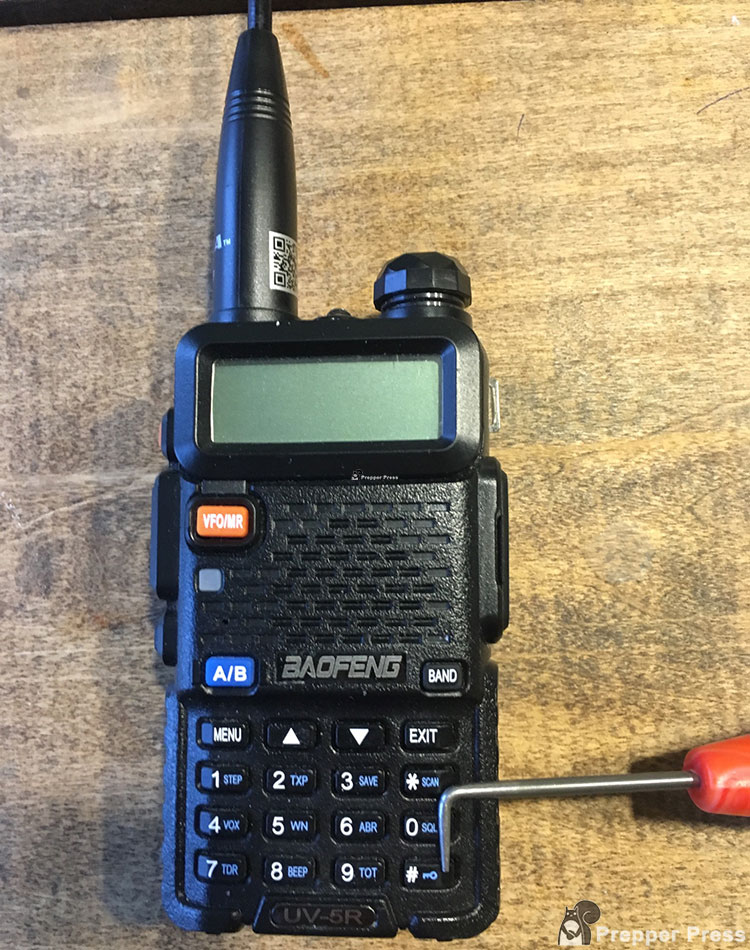
How to Turn Your Baofeng UV-5R On
To turn on your UV-5R, all you have to do is rotate the knob at the top of the radio beside the antenna.
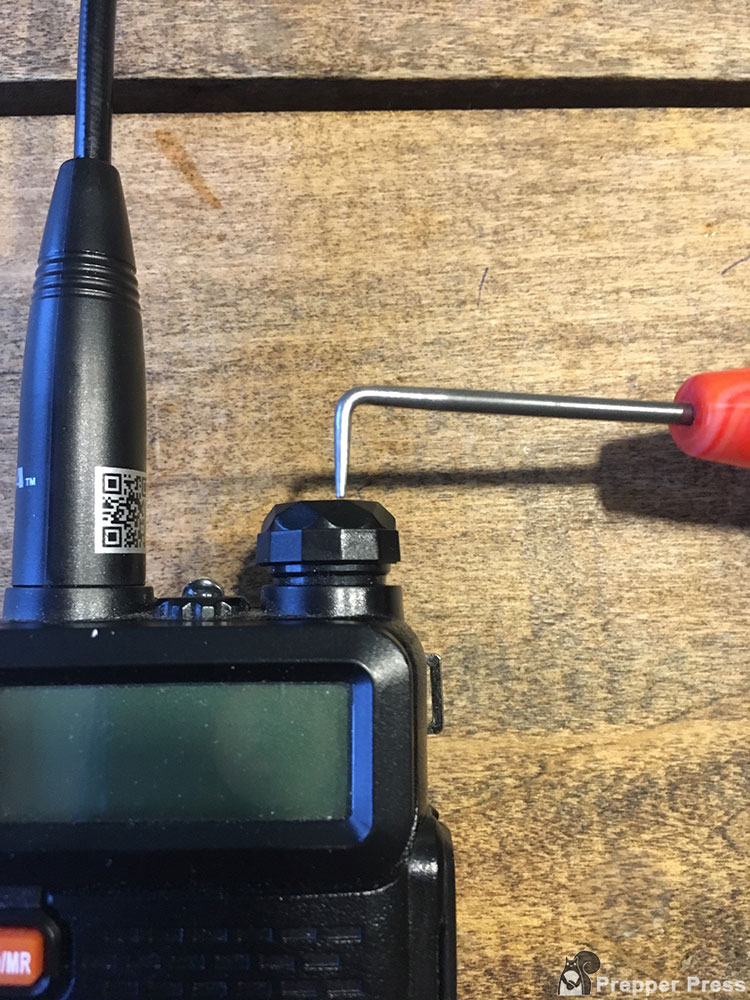
Attaching Accessories
Your UV-5R can have various accessories attached to it through the means of a Kenwood 2-pin connector. If you do decide that you would like to purchase a head set or some other attachment for your UV-5R, you just need to make sure that it is compatible with a Kenwood 2-pin connector.
Just make sure that the radio is off before you attach any accessories.
How to Turn on the Flashlight
Fun fact: your UV-5R has a flashlight. A bit of a Swiss army knife, no? If you want to turn on the flashlight, you have to press the “MONI” button on the left-hand side of the radio.
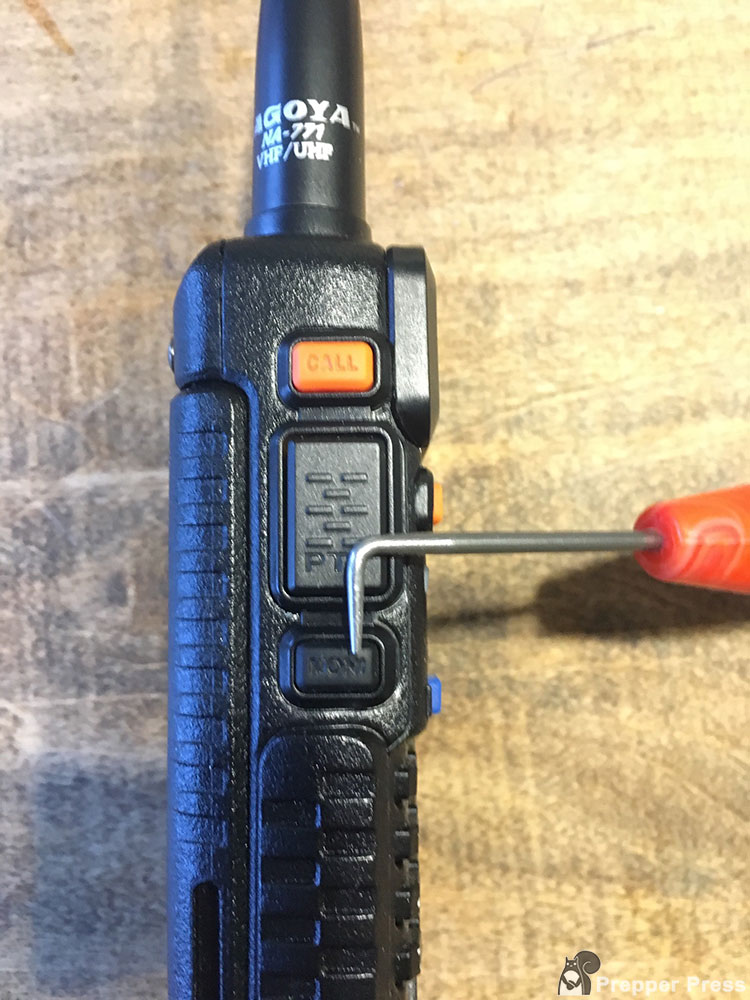
How to Transmit/Talk to Somebody
If you want to contact somebody, once you reach the desired frequency (how to find important ham radio frequencies), push and hold the push-to-talk button on the side of your radio. It’s the biggest button there. Make sure that you hold in the button the entire time that you’re talking, releasing it when you’re done.
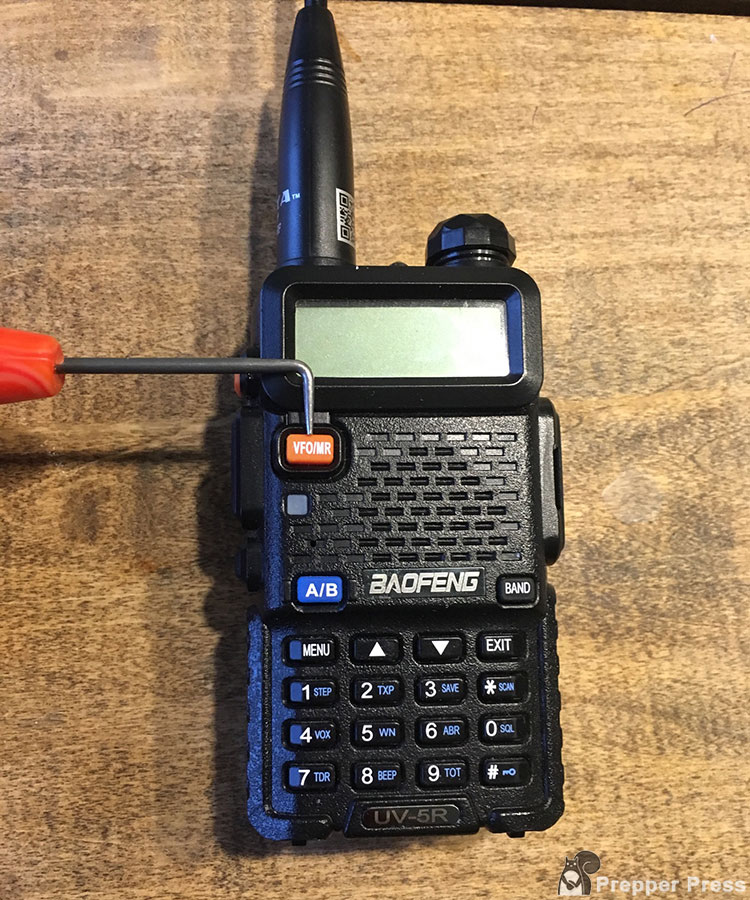
How to Switch Between Channel and Frequency Mode
Your UV-5R has two different modes that you can listen to: Channel mode and Frequency mode. You use channel mode to quickly access the frequencies that you have programmed your radio to remember. This makes it much faster to listen in on and transmit on the frequencies that you like to access often.
Frequency mode allows you to make fine adjustments to get to a particular signal and allows you to scan frequencies to find any incoming transmissions. It’s a bit like the tuning dial on your car’s radio.
Both modes are useful, and you want to know how to access both of them. To switch between Channel Mode and Frequency Mode you have to hit the orange “VFO/MR” button on the face of the radio.
How to Switch the Frequencies You’re Listening to and Transmitting On
Sometimes you may want to listen in on one frequency but transmit on another. This function can be useful in possible SHTF situations where you become a message relay center. Perhaps somebody in a nearby neighborhood needs to contact somebody across the city, but they are too far away to get their message across. Let’s say your son wants you to tell his girlfriend that he’s okay. Cell towers are down, and he has no other way of contacting her. He can get a transmission to you, but he can’t seem to reach her.
This is where such a function could come in handy. So, if you want to receive messages on one frequency, and then transmit on another, you need to use the A/B button.
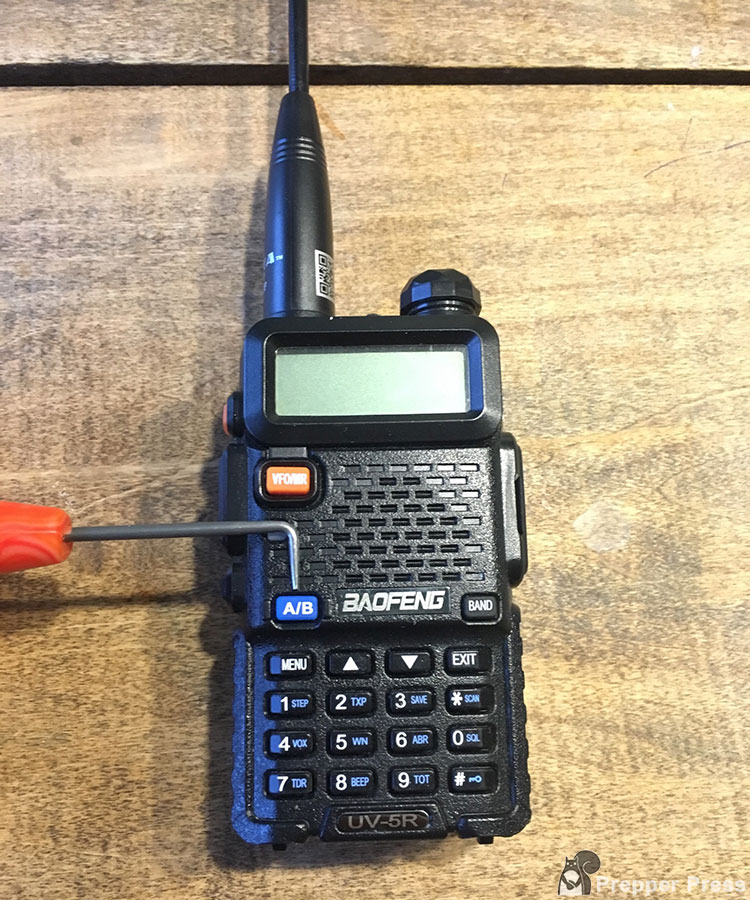
Doing this will switch you between the upper display (referred to as “A” – the frequency at the top of the screen) and the lower display (referred to as “B” – the frequency at the bottom of the screen). When you look at these two frequencies, the frequency that you are listening to is “A” – on the top of the screen – and the frequency that you’re transmitting on is “B” – on the bottom of the screen.
You can leave both “A” and “B” at the same frequency if you want to both listen and transmit on the same frequency, or you can change one from the other. It all depends on what you want to do.
How to Change the Channel You’re On
If you’ve already programmed in a bunch of frequencies into your UV-5R’s memory, you can easily switch back and forth among them by changing the channels. To do so, first ensure that you are in Channel Mode. This can be done by hitting the “VFO/MR” button. Once you are in Channel Mode, hit the up and down arrow buttons to change to your desired channel.
How to Type in a Frequency
Let’s say a buddy gives you a frequency he likes listening to in the early morning. It’s not in your stored channels, but you would like to check it out. Instead of hitting the up and down arrows to slowly tune your radio to the proper frequency, you can quickly access the frequency by typing it in with the UV-5R keypad.
First, you must first be in Frequency Mode. You can access this mode by hitting the “VFO/MR” button. There are two different aspects of changing frequency on a UV-5R to remember: you can change the frequency that you’re listening to, and you can also change the frequency that you’re transmitting on.
Second, press the “A/B” button to select whether you want to change the frequency you are listening to (“A” on the top screen) or the frequency that you are transmitting from (“B” on the bottom screen). (If you want to program a frequency in VHF and you’re currently in UHF – or vice versa – then you’ll need to hit the “BAND” key after this prior step.)
Third, you need to enter the first three digits of the frequency that you want to listen to. This will fill in the numbers on the left side of the decimal. To enter the four digits on the right side of the decimal, you need to round up to the nearest whole number. There are only three spaces for you to enter those last four numbers, so that’s what you have to do. For example, if you want to listen to 145.6875 you need to enter 145.688. The screen will now show the frequency that you wanted to listen to.
Keep in mind that the frequency listed at the top of the screen is the frequency that you are listening to. The frequency at the bottom of the screen is the frequency that you are transmitting on. To change back and forth between the top and bottom of the screen so that you can set each to the desired frequency you must hit the “A/B” button.
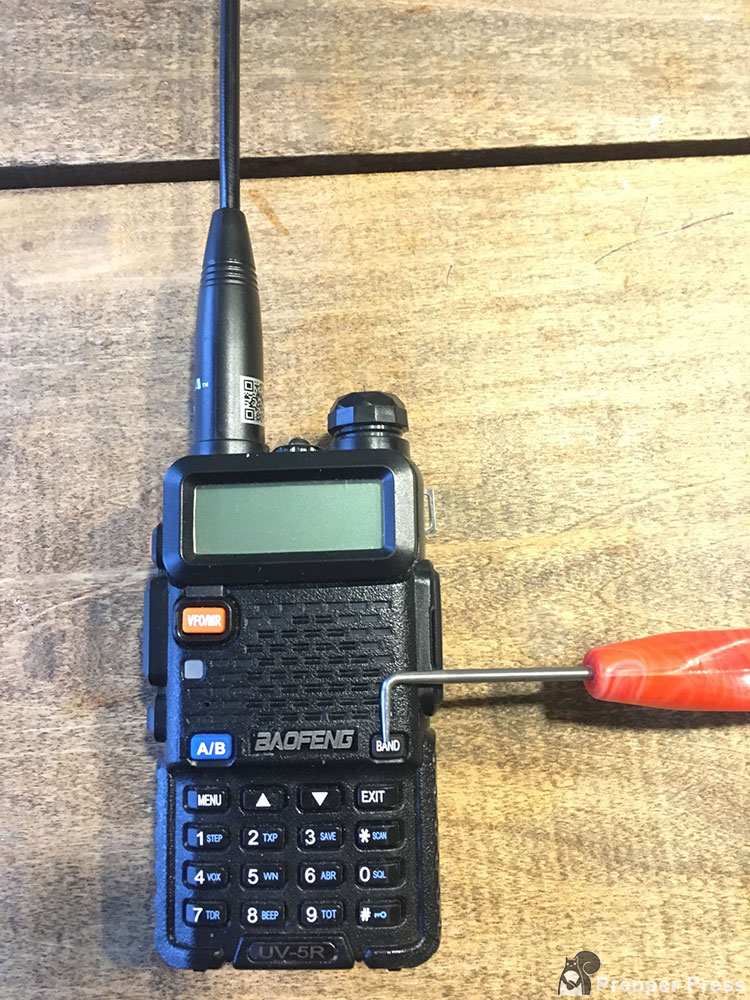
How to Switch Between VHF and UHF
Your UV-5R radio is referred to as a dual-band transceiver. This means that it has access to two different bands – a term used for a grouping of radio frequencies. Let’s say that you have a friend that wants to communicate with you via UHF and currently your radio is set to VHF. If you want to switch bands, follow these instructions:
First, ensure that you are in Frequency Mode. You must hit the orange “VFO/MR” button on the face of the radio if you’re currently in Channel Mode. Once in Frequency Mode, hit the “BAND” key on the right side of the face of the radio.
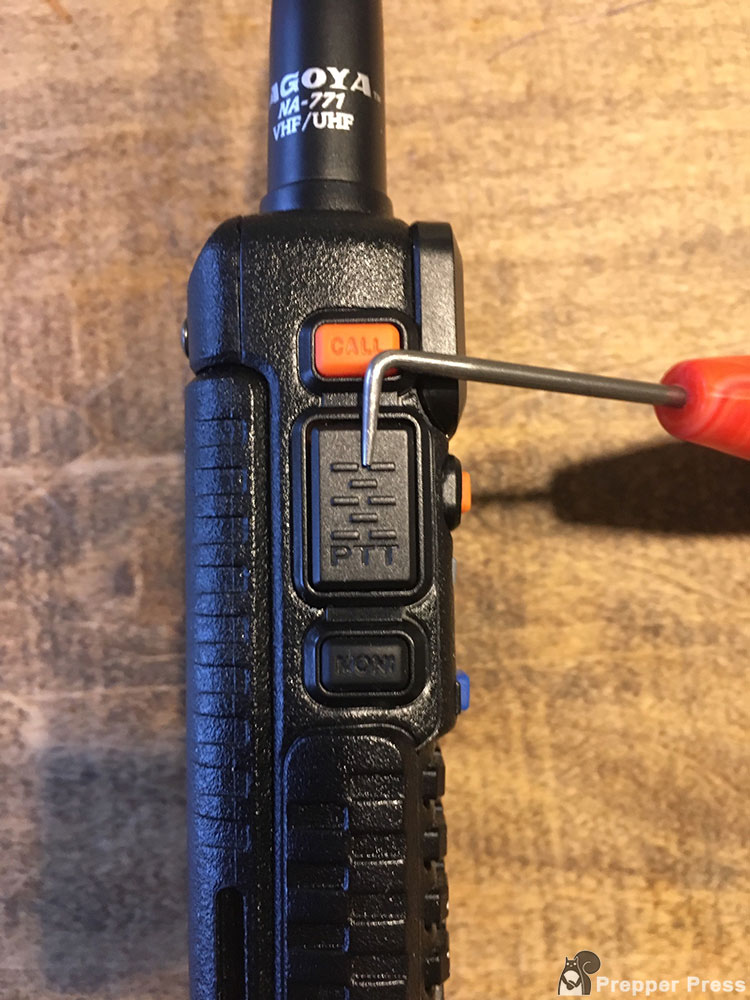
How to Listen to Broadcast FM
Broadcast FM is what most people call “the radio.” This is the series of channels that you listen to music to while you’re driving in your car. For example, 94.6 may be a popular country music channel where you live. You can listen to these frequencies on your UV-5R.
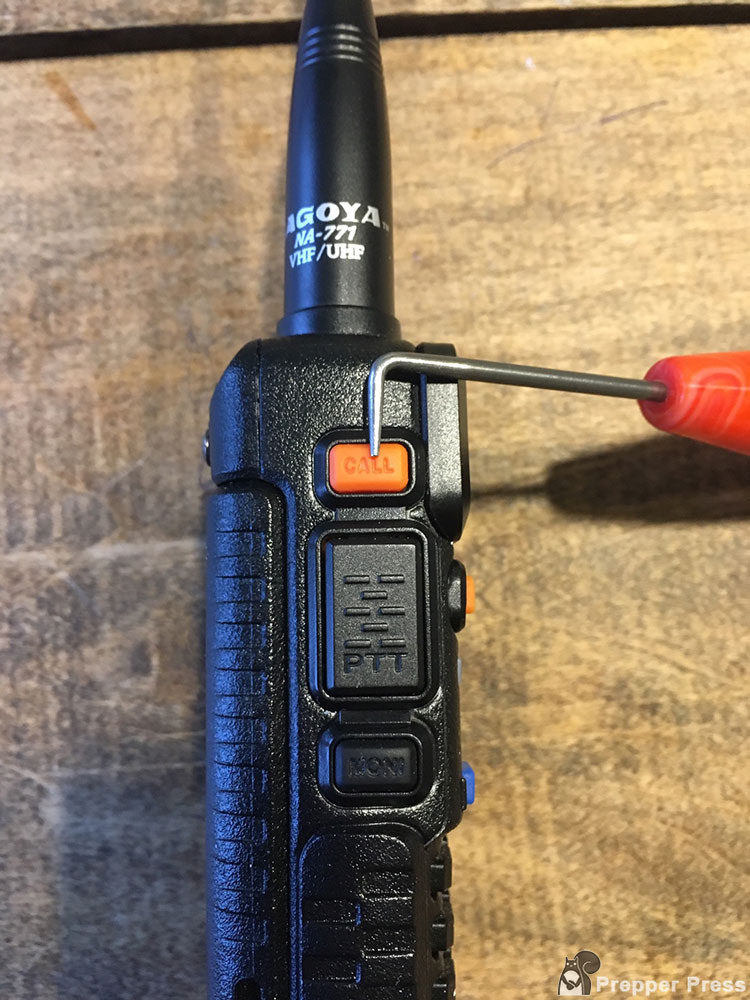
You have to push the orange ”CALL” button on the left side of the radio. Once you have activated broadcast FM, you can then change what channel you’re listening to by hitting the up and down arrows. This will fine tune the frequency to what you want it to be.
To turn off broadcast radio, just hit the “CALL” button one more time.
How to Change Bands Within Broadcast FM
There may be a time when you want to access a different band while in broadcast FM. To do so, you must first put the radio into broadcast FM mode. You do this by hitting the orange “CALL” button on the left side of the radio, above the push-to-talk button.
After you have done this, if you hit the “BAND” button on the front face of the radio, you will switch back and forth from 65 – 75 MHz to 76-108 MHz.
How to Change Your Transmit Power
Let’s say you’re trying to contact somebody 100+ miles away and though you can hear each other, the other party states that your transmission is weak and lost in background static. In this case, increasing your power output can help your transmission to jump out of the static, helping the intended party to be able to hear you loud and clear.
Your UV-5R can has both a Low-Power and High-Power mode. To switch back and forth between the two, you must first switch to Channel Mode.
You can do this by hitting the orange “VFO/MR” button on the face of the radio. Once in Channel Mode, you must then hit the button with a hashtag and a key on it. It’s at the very bottom right of the face of the radio. This will switch you back and forth from Low to High Power.
This only affects transmissions. It does not affect receiving messages. In other words, though switching to High Power may help you get your message further, it will not help you to receive a message from farther away.
Changing the Squelch Level
The squelch level on your UV-5R can be set from 0-9. The default setting is at a 3.
If you would like to fine tune where the squelch is set at for your UV-5R you must do the following:
- Press the “MENU” button.
- From here, utilize the up and down arrows to get to “0 SQL”. This is where you adjust the squelch.
- Press “MENU” to select such.
- Use the up and down arrows to set the squelch where you desire it to be.
- Press the “MENU” button to confirm your decision.
- Press “EXIT” to exit the menu.
How to Lock the Keypad
Perhaps you need to place your UV-5R in your pocket or are in some other situation where you don’t want the buttons of the radio to accidentally get pressed and mess up your current settings. In this case, you can lock the keypad. By doing this, you will lock out all the keys on your radio except for the three keys on the side (where the push-to-talk button is).
To lock the keypad, press and hold the button at the bottom right of the face of the radio.
Press and hold that button for two seconds to lock everything. To unlock the keys, press and hold that same button once more for two seconds.
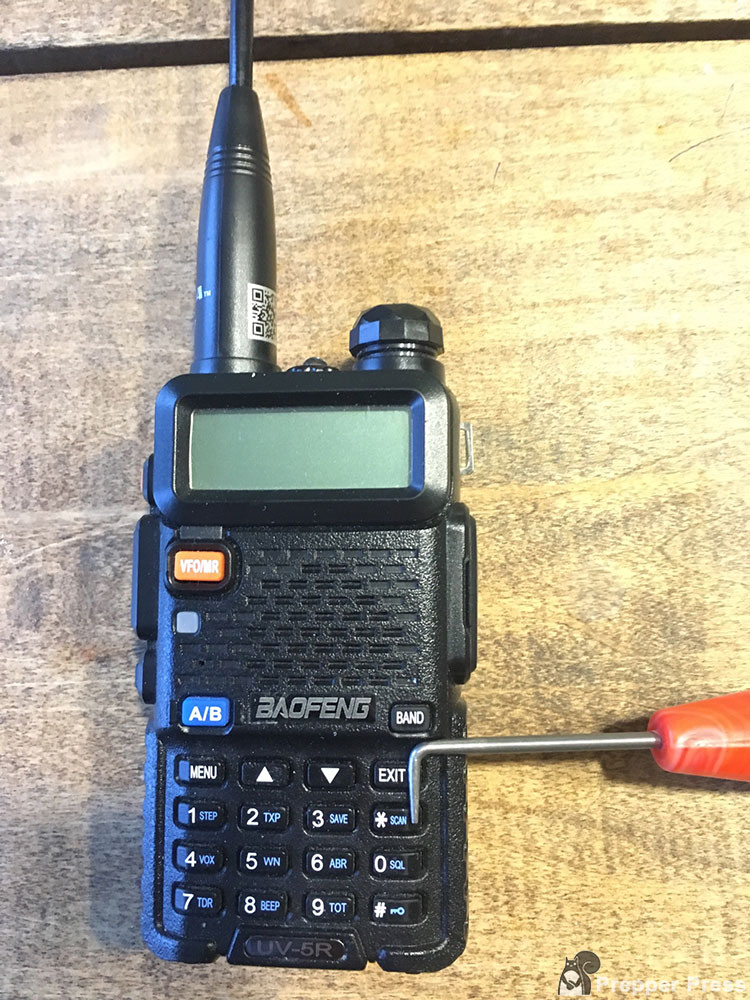
How to Scan Frequencies
Sometimes it is beneficial to just scan through frequencies to see if you can contact anybody. In a disaster situation in a foreign environment, this can help you to get your information out as quickly as possible. You can scan while in Frequency Mode, FM Broadcast Mode, or in Channel Mode.
To scan these frequencies, all you have to do is hold the “*/SCAN” button for two seconds. When you do, the radio will scan until it picks up a signal. Once it does, the scanning process will come to a complete stop until you reengage it. To reengage the scanning process, you must first hit the “*/SCAN” button one time and then hold it for two seconds a second time.
When in Channel Mode, utilizing the “*/SCAN” button will cause you to scan through your stored channels.
Ways to Change Scanning Preferences
There are three different scanning modes that can be used with the UV-5R. You can set it to:
- scan until it detects a signal, and then resume scanning after a pre-set time of no activity on that frequency (Time Operation);
- scan until it detects a signal and then resume scanning as soon as that signal stops (Carrier Operation); or
- scan until it detects a signal, at which point it stops scanning completely until you tell it to again (Search Operation).
In order to change to any of these scanning preferences, first hit the “MENU” button. Then press the “1” key followed by the “8” key. Press the “MENU” key again. Then use the up and down arrows to cycle to the scanning preference that you want. Once you have found the one that you desire hit the “MENU” key to confirm and save your choice. Then hit the “EXIT” key to exit this menu.
How to Monitor Two Frequencies at Once
You may not find this in your Baofeng UV-5R instruction manual, but the radio has the ability to monitor two frequencies at once. This could come in handy in a situation where you have two “rally frequencies” and you’re not sure which one the other party is going to use or when you are trying to gather as much information as possible from the field (e.g. a disaster operation). This ability to monitor two frequencies at once is referred to as “dual watch” functionality. Baofeng UV-5Rs are equipped with dual watch functionality.
To enable or disable Dual Watch Mode, you must first hit the “MENU” button. Then hit the “7” key. Press the “MENU” button to select Dual Watch Mode. Then use the up and down arrows to either enable or disable Dual Watch Mode. Once you have selected your choice, hit the “MENU” button to confirm. Then hit the “EXIT” key to exit the menu.
However, whenever one of your selected frequencies for Dual Watch Mode goes active, your UV-5R will automatically set itself to transmit on that channel. This is something to be careful of if you are monitoring a frequency that you’re not allowed to transmit off of (e.g. police frequencies).
How to Change the Backlight Color
Perhaps you don’t like the default backlight color for the display screen of your UV-5R radio. You can change it to a color that you prefer. You must first hit the “MENU” key. You can change the backlight color for when you are in Standby Mode, when you’re receiving a transmission, or when you’re transmitting. After you have hit the “MENU” key you must then do the following:
- To change Standby Mode color, hit the “2” key followed by the “9” key.
- To change receive color, hit the “3” key followed by the “0” key.
- To change transmit color, hit the “3” key followed by the “1” key.
Press “MENU” to select, after you have chosen which part you want to change the color for. Then hit the up or down arrow to pick your desired color.
After you have done this, hit the “MENU” button to confirm and save your choice. Then hit the “EXIT” button to exit the menu.
How to Add Frequencies to the Radio’s Memory
With your Baofeng UV-5R, you can save various frequencies, power output, group signaling information, bandwidth, and other information for several different “channels.” The ANI and S-Code IDs of any given frequency can only be set with a specialized computer software. You won’t be able to enter that information manually. You can only save channels when working in Frequency Mode and have the upper frequency (the “A” frequency) selected.
To create a new saved channel, first ensure that you are in Frequency Mode by hitting the “VFO/MR” button on the face of your radio. Then select your desired frequency by either scrolling with the arrows towards it or by manually typing in the frequency with the keypad.
If the frequency you’re interested in saving is a simplex channel, do the following:
- Press the “MENU” key.
- Press the “2” key followed by the “7” key. You’ll see the display read MEM-CH.
- Press “MENU” to select this option.
- Use the up and down arrows to then select the appropriate channel that you would like to store the frequency as.
- Press the “MENU” key to confirm your decision.
- Then press the “EXIT” button to exit the menu.
A duplex channel utilizes a duplex repeater. A repeater is basically a tower that receives your transmission and then sends it like a rocket further along. This allows your transmissions to travel much farther. A duplex repeater both transmits transmissions and receives transmissions at the same time.
If you want to use a duplex repeater you must set up your radio to both transmit and receive on different frequencies while on the same memory channel within your radio. In other words, if you’ve set up Channel 7 as a duplex channel, you have to be able to utilize your Channel 7 to transmit and receive at the same time.
Duplex repeaters require a very specific frequency for messages to be “input” and processed by the repeater. They then transmit this same message and a slightly different output frequency. Think of these input frequencies as something akin to a hidden door. If you can find the hidden door, you can enter it and use what’s inside.
You can often find what the “input” frequencies are for the duplex repeaters within your geography by searching online, utilizing the app RepeaterBook, or by talking with other HAMS in your area. Some duplex receivers you won’t be legally permitted to use, so figure that out first.
Once you find what the input frequency is, and if you determine you can legally use the duplex repeater in your area, here is how you program your UV-5R to use it:
- Turn the radio to Frequency Mode by hitting the “VFO/MR” key.
- Enter the output frequency of the duplex receiver you are trying to reach by using the numerical keypad or the down and up arrows on the face of your radio.
- Press the “MENU” key to confirm your frequency decision.
- Hit the “2” key followed by the “6” key. This will take you to frequency offset.
- Press “MENU” to select such.
- Use the up and down arrows/numerical keypad to enter the specified frequency offset for the duplex repeater you are programming for.
- Once you find such, hit “ENTER” to save your choice.
- Then hit the “2” key followed by the “5” key to get to the offset direction.
- The up and down arrows can be used at this point to select for either a positive or a negative offset.
- Press “MENU” to confirm your decision.
- Odds are that due to the amount of work involved for such, you’ll want to save all of this as a memory channel within your UV-5R. To do such, hit the “*/SCAN” key to go into reverse mode, and then save that to the same memory channel.
- Hit the “EXIT” key to exit the menu.
If everything worked correctly, you should then be able to utilize the duplex repeater to broadcast your message even further than you would have been capable of otherwise. Keep in mind that there are some repeaters out there that first require a 1750Hz burst to “open up” the gates of the repeater and allow you to use them.
How to Remove Saved Frequencies
Did you add a frequency that you now want to remove? Follow these steps to get rid of them:
- Press “HOLD’ button
- Enter the channel number you want to delete
- Press “Pgm/E”
- Scroll down to “Delete Channel”
- Press “Pgm/E”
- Select ‘Confirm” and hit “Pgm/E”
How to Send a 1750Hz Burst
You’ll often need to do this prior to accessing many repeaters out there. It’s this specific burst that opens up the repeater to incoming traffic, allowing you to broadcast your message further. To send a 1750Hz burst, you must press the “BAND” key while simultaneously holding down the push-to-talk button on the side of the radio.
How to Turn on Hands-Free Usage
Your UV-5R has hands-free abilities. This is referred to as “VOX.” This can be useful when attached to a headset and utilized for hunting trips, paintball games, and so forth. It allows you to simply talk and have the radio broadcast your message for you. And all without your ever having to press the push-to-talk button. It is completely hands free. The default setting on your UV-5R is for the VOX to be turned off.
To turn VOX on, perform the following:
- Press the “MENU” button.
- Utilize the up and down arrows to get to option “4 VOX.”
- Use the up and down arrows to both select the sensitivity of VOX and to turn it on or off.
- Once you have made your decision, hit the “MENU” button to confirm.
- Then hit “EXIT” to exit the menu.
Download Our Baofeng UV-5R Instruction Manual PDF
I hope you’ve found this article helpful and that it saves you the frustration that I and many others have had when trying to make sense of the standard Baofeng UV-5R instruction manual. If you’d like to download this article for future use or for printing, we’ve built a convenient PDF file to make it easier.
Download the Prepper Press Baofeng UV-5R Instruction Manual (PDF)
Ham radio is truly a treasure trove of information. Once you start to scratch the surface, you quickly realize just how deep this stuff runs. Every ham that I’ve talked to yet has told me that there’s more to ham radio than you’ll ever be able to learn in a lifetime. This isn’t to discourage anyone from getting into the hobby, but instead to help you understand that there are a lot of different routes and aspects that you can both take and focus on.
There’s a lot more that your UV-5R is capable of, but that’s beyond the scope of this piece If you have a firm understanding of the above, however, you’ll most certainly be able to get your money’s worth out of your UV-5R and be able to use it to get and transfer the information that you need in order to keep you and your own safe.
Are there other aspects of the UV-5R that you think we should have covered? Do you have past experience with a UV-5R? Let us know in the comments below!