Program a Ham Radio with CHIRP – Dummy’s Guide
written by Aden Tate – SHTF BLOG https://www.shtfblog.com/
If you’ve purchased a ham radio, you’ve probably heard of the programming software CHIRP. If you’ve downloaded it though, it can quickly prove to be rather daunting. You don’t want to mess up your radio, and there are so many settings to change it can be downright terrifying.
CHIRP is free software that manages a ham radio’s address book. It’s open source software and works with predominant PC operating systems (easiest with Windows).
I’m going to show you how to program your ham radio with CHIRP, focusing just on the essentials. You can do quite a bit with this software, but we’re going to look at the meat and potatoes of what it is you actually need.
1 – Download CHIRP
The safest place to download CHIRP is directly from the site here: https://chirp.danplanet.com/projects/chirp/wiki/Download
If you’re downloading CHIRP from anywhere else, you really don’t know what it is that you’re getting until you open it (and maybe not even then).
After you walk through the installation steps (very simple) you’re need to open CHIRP.
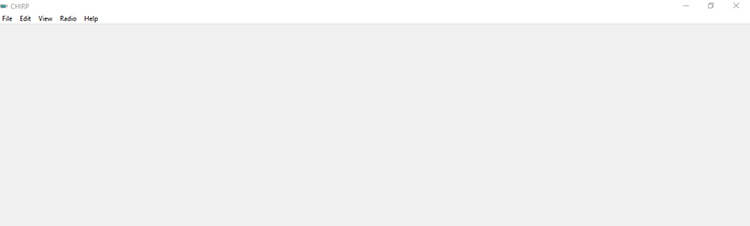
You will be presented with a blank screen upon initial setup. The first time I used CHIRP, I remember thinking the software was broken. It’s not. This is just the way things look initially.
2 – Connect Your Programming Cable
Take your programming cable and plug it into both your radio and your computer. Then click the ‘Radio’ tab in the upper left corner of the screen. A dropdown menu will appear. Click “Download from Radio.”
3 – Install the Software on Your Ham Radio
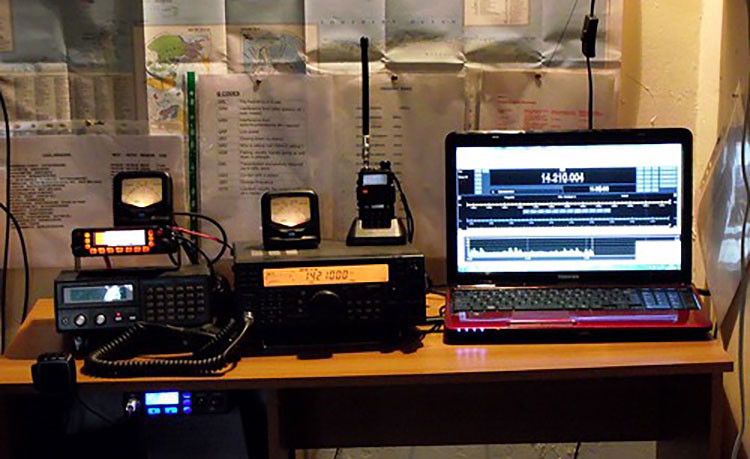
A pop-up appears that is going to want you to select the type of radio you have connected. For this example, I’m using the ubiquitous Baofeng UV-5R (see our Baofeng UV-5R instruction manual FMI). If the program doesn’t want to connect to your radio, make sure that you’re selecting the proper USB port.
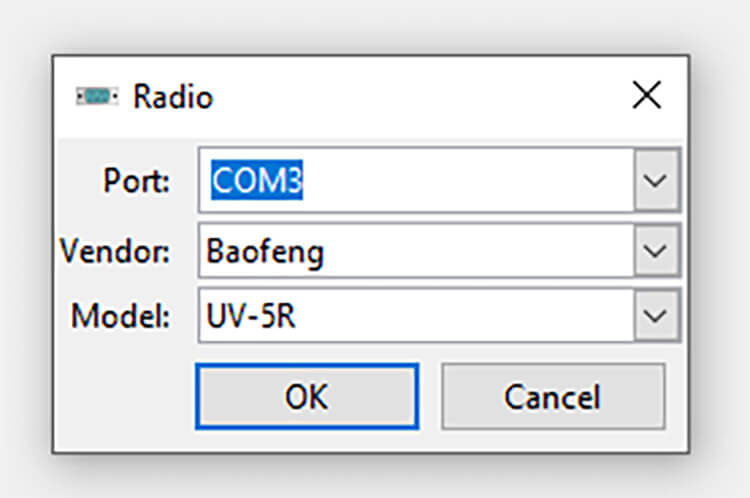
Another pop up will likely show up ensuring that you have everything connected properly with your radio. Click the confirmation button within the pop up, and you should start to see a little green bar showing that your radio is sending its information to the computer. If you’re using a Baofeng UV-5R, it will blink red as you’re doing this.

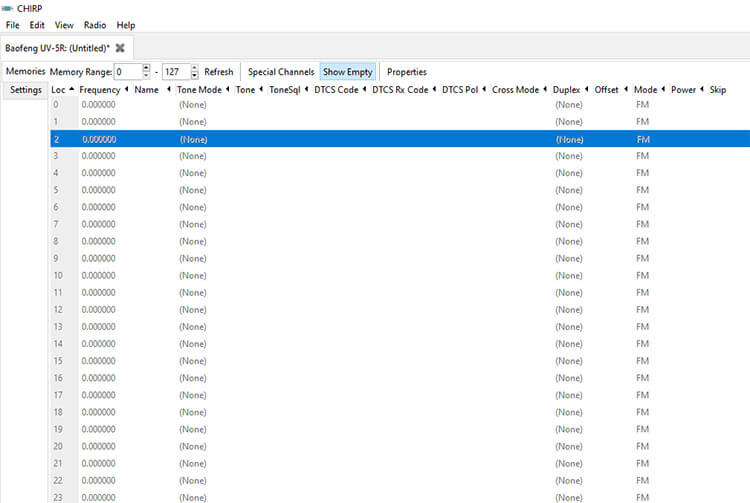
Once everything shows up, you’ll generally see what looks like a blank Excel sheet.
4 – Program Local Repeaters with CHIRP
Alright, now we have something we can work with. The very first thing I do is program in my local repeaters. This is a simple process that takes about 20 seconds.
- Go to the upper left corner and click the “Radio”’ tab.
- Hover over “Import from Data Source.”
- Then hover over “RepeaterBook.”
- Then click on “RepeaterBook Proximity Query.”
RepeaterBook is a great directory of virtually all the repeaters in the United States. It coordinates with CHIRP so that you don’t have to manually enter all the settings in for these repeaters (which can take hours). This saves you a lot of time.
I make my selections for my location, and then select what band of frequencies I want to program. I’m starting with 70cm. After I confirm my selection, a new pop up will show up looking something like this:
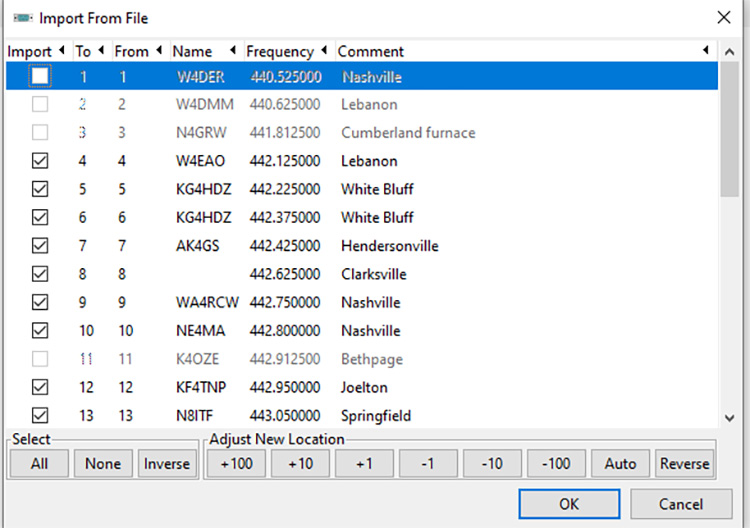
This shows me all the 70cm repeaters around Nashville I can access with a Baofeng UV-5R.
Remember at the very beginning where I entered in what type of radio I was using? CHIRP uses that information to automatically grey out any repeater it knows the radio cannot accommodate. That’s why a lot of those repeaters in the image above aren’t selectable. Only the ones I can use with my plugged-in radio are available.
We do have a problem, though. You’ll notice that on the left side of the above image, the blacked-in numbers start at 4. This means if I turn on my radio and put it into memory mode, it will start with Channel 4. There will be three channels of wasted space then! Baofeng UV-5rs don’t have a lot of memory to begin with, so this is bad. I want to utilize as many of my memory channels as possible here.
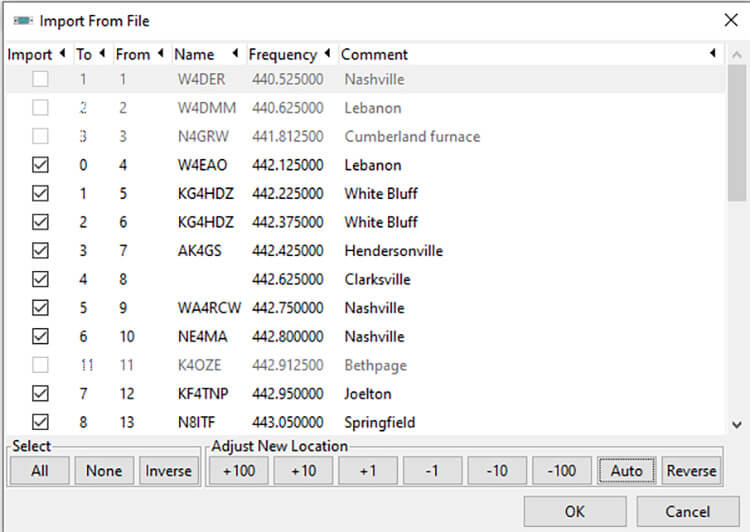
There’s a quick way to fix this. At the bottom right corner of the pop up, there’s a button that says “Auto.” Click it. You’ll see that the numbers automatically switch themselves to start at 0. That’s what we want.
After I click the “OK” button to confirm my choices, we’ll be returned to the home page. You can see all the frequencies have now been programmed into this part of the software.

That means the 70cm repeaters around Nashville are good to go. They’re not in my radio yet, but they’re programmed into the software on the computer. They’re staged to be programmed. That’s an important distinction, so don’t unplug anything yet. I’ll show you how to disconnect safely later.
The next step is to program in my 2m repeaters around Nashville.
- I return to the “Radio” tab at the top left of the screen
- Hover over “Import from Data Source.”
- Hover over “RepeaterBook.”
- Click “RepeaterBook Proximity Query.”
Select your location, select the band you’re wanting to program, and then confirm your choices.
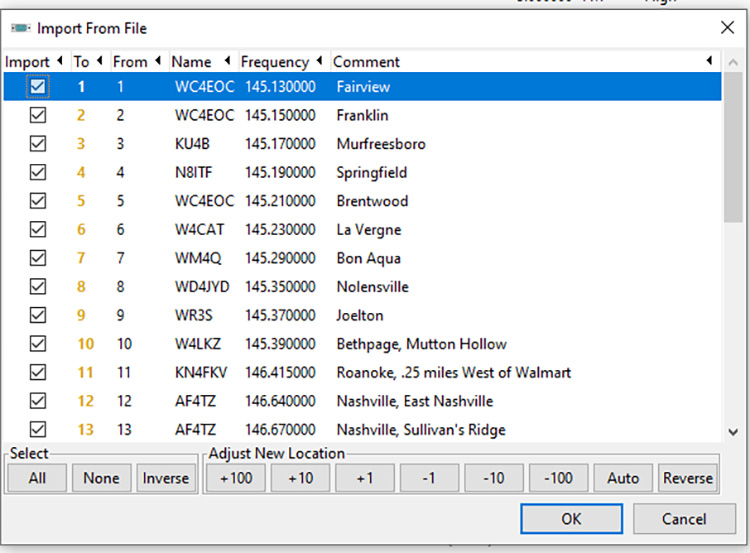
You’ll see a pop up like this show up.

You’ll probably immediately recognize a problem. See the numbers on the left side of the pop up? They start at 1. This means if we just click OK, this information would replace all of those 70cm frequencies we just worked for.
You don’t want to do that. Here is how you fix it:
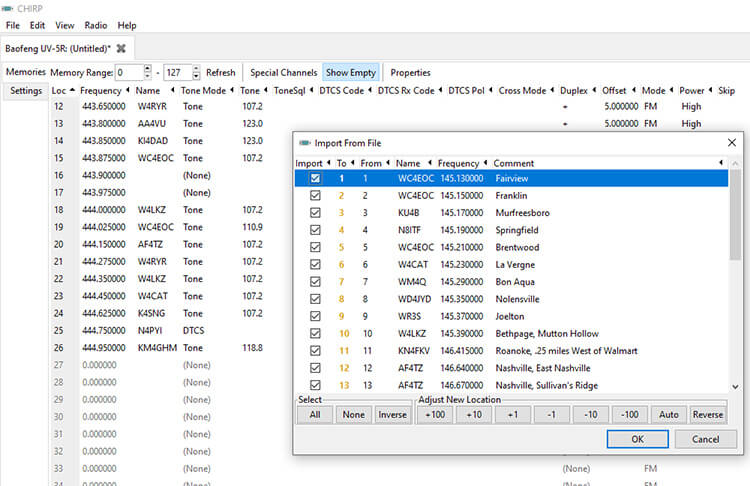
To start, I go to the bottom right corner of the pop up and click the “Auto” button. This removes any unused repeaters from the “countdown.” Now, if I look at where my 70cm frequencies cut off, I can see that Channel 27 is empty. That’s where I want to start to insert my 2m frequencies here.
See the image below. On the left side of the screen the row for 27 is empty. You’ll also see the pop up currently wanting to start at Channel 1.
To fix this, look at the bottom center of the pop up. You see that “+10” button? I click that. It bumps up the number of the channel I would be starting at by ten every time I click it. So, in this instance, I click it twice.
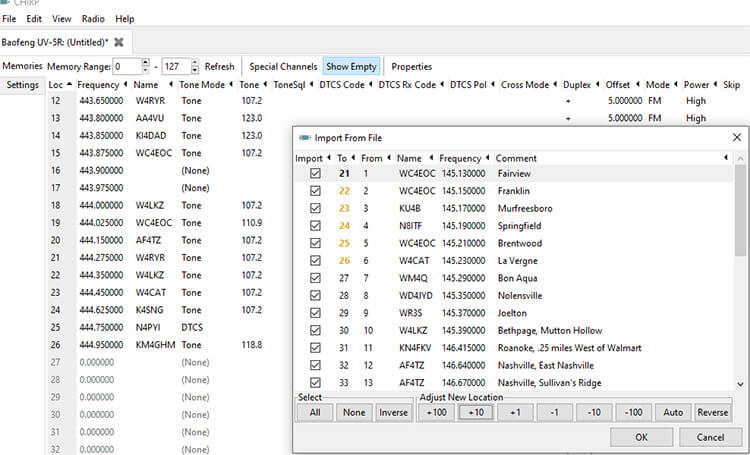
Do you see how it puts me at Channel 21 after I click it twice?
That’s good, but I don’t want to overwrite Channel 21 and beyond. I already have 70cm frequencies stored there! I want to start at channel 27. So, now I need to go to the bottom center of the pop up and click the “+1” button until I get to Channel 27 within the pop up.
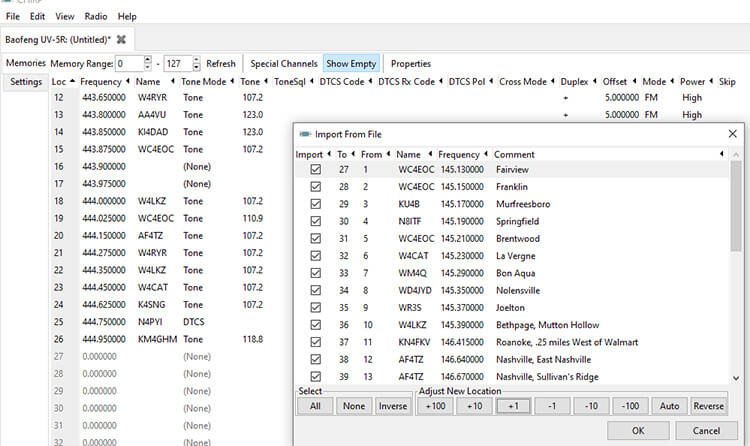
There we go, just like the above image. Row 27 is empty in the main screen, and I’ve now selected that my 2m frequencies are going to start at Channel 27. I confirm my choices by clicking the ‘OK’ button in the bottom right corner of the pop up.
I end up with a home screen that looks like this:

That’s how you program in your repeaters. Perhaps you want to continue by programming in all the other repeaters in nearby counties. That’s up to you. It wouldn’t be a bad idea if you have a long drive to work and want to be able to communicate along the entire route.
5 – Program NOAA Weather Alerts with CHIRP
You may be considering adding NOAA weather frequencies to your radio next. These are some of the most important radio frequencies preppers should know. Adding these is a good decision if you want your radio ready for preparedness purposes. CHIRP can easily program these frequencies in for you as well.
- Go to the top left corner of the screen and click the “Radio” tab.
- Hover over “Import from Stock Config.” There is a host of pre-formatted frequencies from here you can easily program into your radio.
- I click on “NOAA Weather Alert.”
This will bring up a pop-up that looks like this:
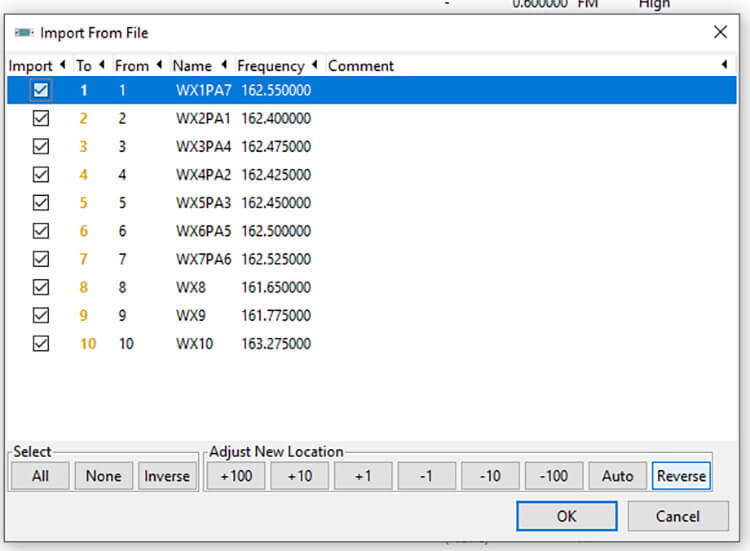
Again, you see the problem. It wants to start at Channel 1. I don’t have to click the “Auto” button in the bottom right this time because I can access every single one of these frequencies. The only thing I need to do is to click the “+10” and the “+1” buttons until I get to the channel number, I want to program these frequencies into.
After I make my selections and confirm, you can see that everythign should look something like this in the home screen:
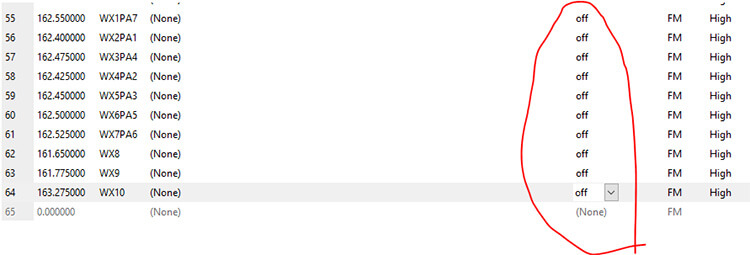
I have two pretty big issues now that I need to fix. I circled one of them. You do not want to make the FCC angry by transmitting on frequencies you’re not allowed to. Remember, you can listen without a ham radio license, but you can’t transmit without one.
NOAA weather frequencies are one of those frequencies you NEVER want to transmit on. If you do that, you will end up in serious trouble. So, let’s eliminate some of that risk we would ever do that.
Where I circled is under the “Duplex” column. I click on each individual row of the NOAA weather frequencies under the that column and change the selection to “Off.” This makes it so that you can receive these frequencies, but you cannot transmit on them.
Despite my setting this up within CHIRP, I’m still afraid of accidentally hitting the PTT button on the left side of my UV-5R when one of these stations is pulled up. It shouldn’t be programmed to do anything, but I’m not experimenting. Just play it safe and watch out for that button when you’re messing around with frequencies you’re not permitted to transmit on.
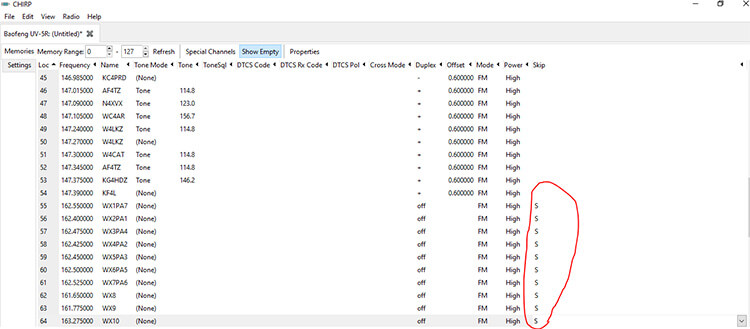
The next thing I like to fix with NOAA frequencies is to remove them from the scanning feature of the radio. NOAA weather channels transmit 24/7. If you put your radio on scan, you’re going to stop at every NOAA channel along the way, unless you remove them from the scanning list.
To remove frequencies from the scanning list, go to the “Skip” column, and change the selection to “S.” These are now removed from the scanning list. I can easily punch in Channel 58 to listen to a NOAA broadcast, but I won’t stop at it automatically within scan.
Awesome. We now have our 70cm repeaters, our 2m repeaters, and our NOAA weather frequencies programmed into the radio.
At this point, we know how to program repeaters, how to make it so that frequencies are receive only, and how to remove frequencies from the scan function of our radios.
Technically, we also know where to find a host of other pre-set up frequencies within CHIRP (the same area where we found our NOAA weather frequencies).
6 – Program Other Frequencies in CHIRP
Let’s look at adding frequencies individually now. This is helpful if you’re programming in police, EMS, or a stock channel you and your buddies in your network want to use as a primary frequency for your use.
For this example, I’m going to add in the local hospital frequencies. If you’re looking to add police, fire, EMS, public works, school buses, hospital, or any other form of public frequencies, the best place to find them is over at RadioReference.com.
Pull up the site, and at the top left of the page should be a “Databases” tab. Hover over it and select the “Frequency Database.”
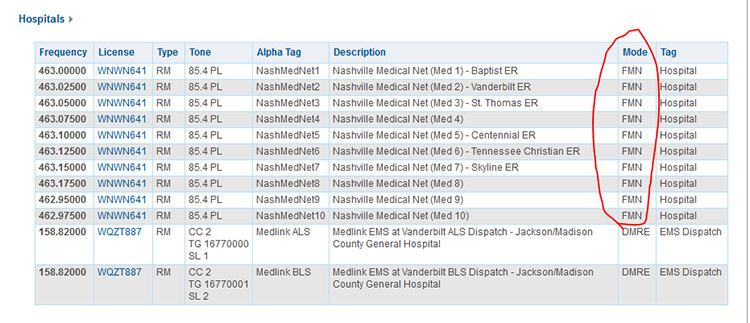
This will take you to an interactive map of the United States. Select whatever state you’re in. I picked Tennessee, and then clicked on Davidson County (where Nashville is). If I scroll down, I’ll see the “Hospitals” subsection. Those are the frequencies I’m going to manually program into CHIRP.
A Baofeng UV-5R is pretty much limited to FM and FMN mode, so I have to make sure whatever I’m going to program fits that mode. If you see anything else here, you’re out of luck. The UV-5R is an analog radio, meaning P25, DMR, and other digital or trunked formats are inaccessible to you.
Nevertheless, there’s still a lot of information out there on the radio spectrum we can suck up with a UV-5R. My hospital frequencies here are one of them.
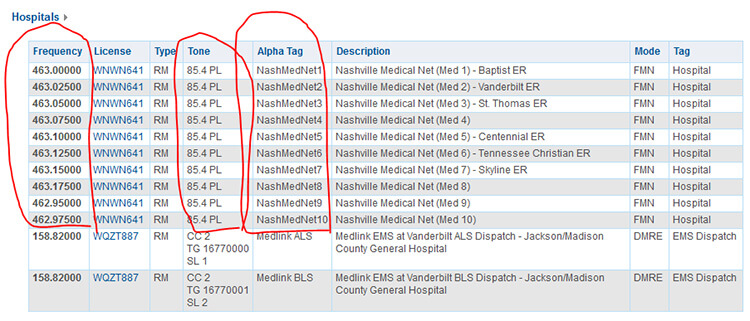
In the image below, the circled areas represent the information I’m interested in. I am going to program in the frequency (duh), the tone, and the alpha tag. The tone is kind of like the secret password that lets me listen in on that frequency. The alpha tag simply makes it so that I know what I’m listening to on my radio.
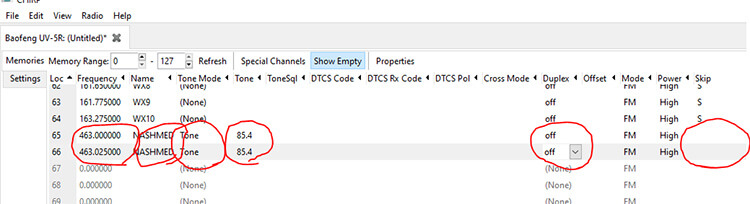
The first thing I did was go to the next empty row on the home screen of CHIRP. It was row 65 in my case here. You’ll notice that I programmed in the frequency. All I had to do was click on this empty slot and then type in 463.00000. Piece of cake!
The column titled “Name” is where I put my alpha tag. On RadioReference, this frequency has the alpha tag of NashMedNet1. So, under the “Name” column here I put NashMedNet1.
If I have my UV-5R “A” line and “B” line both set to Channel 65 now, I’ll see the frequency on the “A” line and the name NashMedNet1 on the “B” line.
I have to change the tone (the secret password) next.
- Under the “Tone Mode” column, I select “Tone.”
- Then in the “Tone” column, I select 85.4 because that’s what RadioReference said the tone was for this particular frequency. The “PL” there stands for “private line.”
Just like with my NOAA weather frequencies, I changed the duplex column to “off” here. I don’t want to transmit on my hospital’s frequencies. I just want to listen.
If you’re manually programming in your primary communications channel for you and your buddies for survival situations, you’re NOT going to want to change that to “off.” Doing so will only make it so that you can’t talk to them.
You’ll also notice that I DID NOT select to skip this frequency in the scan mode. If there’s traffic going on at the hospital’s frequency (I actually have two of them programmed in here so far), I want to know about it.
That’s How You Program a Ham Radio with CHIRP!
When you’re done programming with CHIRP, go to the “Radio” tab at the top left of the screen and select “Upload to Radio.” This will upload all your CHIRP settings you just worked for right to your radio. After I do this, I close out of CHIRP, turn off my radio, and disconnect my cabling.
I like to test my radio afterwards as well, to ensure that everything is working.
And that’s all there is to it! That should show you how to program just about anything you want via CHIRP.
If you don’t already have one, I highly recommend you expand your ham radio knowledge by buying a copy of the ARRL Ham Radio License Manual. It’s an invaluable resource.